Saab 9000 Central locking wiring: Difference between revisions
No edit summary |
No edit summary |
||
| (2 intermediate revisions by the same user not shown) | |||
| Line 1: | Line 1: | ||
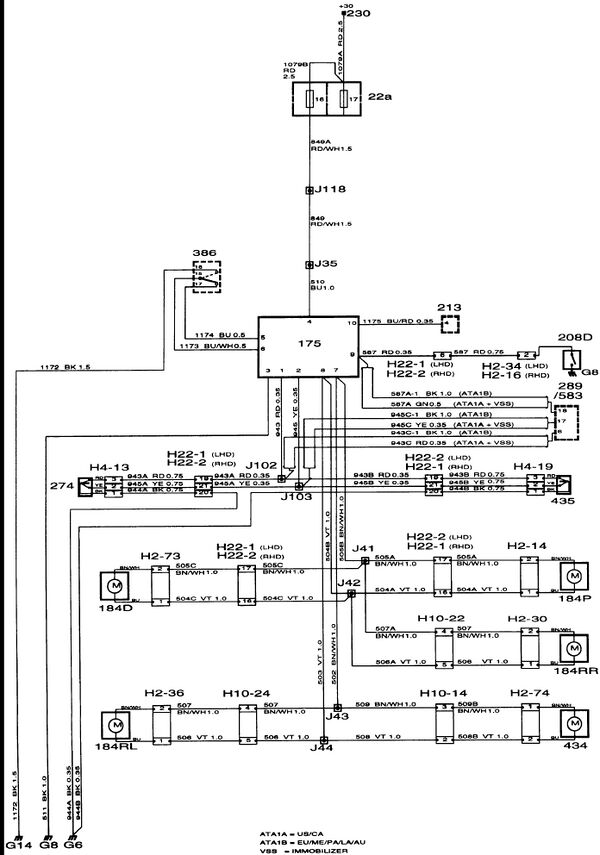
[[File:62530238.jpg|600px|thumb|right|Saab 9000 Central Locking Wiring]] | [[File:62530238.jpg|600px|thumb|right|Saab 9000 Central Locking Wiring]] | ||
==Component key, description of operation and fault finding== | ==Component key, description of operation and fault finding== | ||
* 22a Main fuse board behind the access panel in the glove box. | * 22a Main fuse board behind the access panel in the glove box. | ||
| Line 19: | Line 14: | ||
* 434 Motor, central locking system, fuel filler flap, adjacent to the fuel filler flap. | * 434 Motor, central locking system, fuel filler flap, adjacent to the fuel filler flap. | ||
* 435 Microswitch, beside the lock cylinder in the front passenger's door. | * 435 Microswitch, beside the lock cylinder in the front passenger's door. | ||
* 514a Switch, simultaneous actuation of the central locking system, in window lift switch assembly (386) on the | * 514a Switch, simultaneous actuation of the central locking system, in window lift switch assembly (386) on the center console. | ||
* 583 Control module, anti-theft alarm with immobilizer, under the dashboard on the right-hand side behind the knee shield.2-Pin Connectors | * 583 Control module, anti-theft alarm with immobilizer, under the dashboard on the right-hand side behind the knee shield. | ||
* H2-14 In the right-hand front door, beside the locking mechanism.H2- | ==2-Pin Connectors== | ||
* H2-14 In the right-hand front door, beside the locking mechanism. | |||
* H2-16 Beside the locking mechanism inside the right-hand front door. | |||
* H2-30 In the right-hand rear door, beside the locking mechanism. | * H2-30 In the right-hand rear door, beside the locking mechanism. | ||
* H2-34 Beside the locking mechanism inside the left-hand front door. | * H2-34 Beside the locking mechanism inside the left-hand front door. | ||
* H2-36 In the left-hand rear door, beside the locking mechanism. | * H2-36 In the left-hand rear door, beside the locking mechanism. | ||
* H2-73 Beside the locking mechanism in the driver's door. | * H2-73 Beside the locking mechanism in the driver's door. | ||
* H2-74 On the right-hand side in the luggage compartment beside the central locking motor for the fuel filler flap.4-Pin Connectors | * H2-74 On the right-hand side in the luggage compartment beside the central locking motor for the fuel filler flap. | ||
==4-Pin Connectors== | |||
* H4-13 In the left-hand front door, adjacent to the microswitch. | * H4-13 In the left-hand front door, adjacent to the microswitch. | ||
* H4-19 In the passenger's door beside the locking mechanism.10-Pin Connectors | * H4-19 In the passenger's door beside the locking mechanism. | ||
==10-Pin Connectors== | |||
* H10-14 In the luggage compartment to the left beside the rear filament monitor. | * H10-14 In the luggage compartment to the left beside the rear filament monitor. | ||
* H10-22 In the right-hand B pillar. | * H10-22 In the right-hand B pillar. | ||
* H10-24 In the left-hand B pillar.22-Pin Connectors | * H10-24 In the left-hand B pillar. 22-Pin Connectors | ||
* H22-1 Behind the cable entry in the left-hand A pillar. | * H22-1 Behind the cable entry in the left-hand A pillar. | ||
* H22-2 Behind the cable entry in the right-hand A pillar.Grounding Points | * H22-2 Behind the cable entry in the right-hand A pillar. | ||
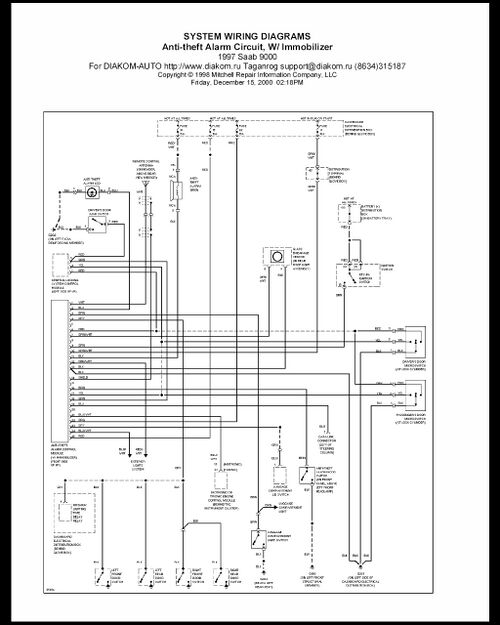
[[File:Anti-theft with VSS.jpg|500px|thumb|right|Anti-theft with VSS]] | |||
==Grounding Points== | |||
* G6 Grounding point, negative distribution terminal, in the main fuse box (22B) behind the glove box. | * G6 Grounding point, negative distribution terminal, in the main fuse box (22B) behind the glove box. | ||
* G8 Grounding point, dashboard, by the left-hand front loudspeaker socket. | * G8 Grounding point, dashboard, by the left-hand front loudspeaker socket. | ||
| Line 39: | Line 40: | ||
==DESCRIPTION OF OPERATION== | ==DESCRIPTION OF OPERATION== | ||
With the key in the driver's door or front passenger's door, all the car's doors and fuel tank filler cap can be locked and unlocked centrally.<br> | |||
Control module 175 for the central locking system is continuously supplied with current via fuse 16.<br> | |||
The control module is controlled from microswitch 274 in the driver's door, microswitch 435 in the passenger's door or from a switch in switch unit 386 in the centre console.<br> | |||
When the doors are locked, terminal 2 of the control module is grounded and current is supplied for 0.7 seconds to all actuating motors, closing the locks. The motors are grounded via terminal 8.<br> | |||
When switch 514a (LOCK) on the centre console is activated, terminal 5 of the control module is grounded and current is supplied for 0.7 seconds to all actuating motors, closing the locks. The motors are grounded via terminal 8.<br> | |||
When the driver's or passenger's door is unlocked, terminal 1 of the control module is grounded and current is supplied for 0.7 seconds to all actuating motors, opening the locks. The motors are grounded via terminal 7.<br> | |||
When the switch on the centre console is activated (by pressing the part of the switch with no symbol), terminal 6 of the control module is grounded and current is supplied for 0.7 seconds to all actuating motors, opening the locks. The motors are grounded via terminal 7.<br> | |||
If the driver's door is not completely closed and an attempt is made to use the central locking system from this door or from the switch on the centre console, it will not be possible to lock the doors.<br> | |||
If an attempt is made to use the central locking system from the passenger's door when the driver's door is not completely closed, the control module will lock the doors, only to unlock them again shortly afterwards.<br> | |||
==FAULT DIAGNOSIS HINTS== | ==FAULT DIAGNOSIS HINTS== | ||
| Line 65: | Line 59: | ||
==IMPORTANT== | ==IMPORTANT== | ||
Control module terminals 7 and 8 are live for only about 1 second , so readings on them must be taken at the precise moment when the locking mechanism changes position. In the inactivated position, both outputs are grounded. | |||
Note also that the actuating motors (on testing) should be connected only to pins 7 and 8 of the control module. Otherwise the motors could be overloaded and damaged. | |||
Latest revision as of 00:45, 10 March 2022
Component key, description of operation and fault finding
- 22a Main fuse board behind the access panel in the glove box.
- 175 Control module, central locking system, on a bracket under the dashboard on the left-hand side.
- 184D Motor, central locking system, in the driver's door.
- 184P Motor, central locking system, in the passenger's door.
- 184RL Motor, central locking system, in the rear left-hand door.
- 184RR Motor, central locking system, in the rear right-hand door.
- 208 Door lock indication, in the locking mechanism inside each door.
- 213 Pictogram, in the main instrument display panel.
- 230 Distribution terminal (+30 circuit) in main fuse box behind the glove box.
- 274 Microswitch, beside the lock cylinder in the driver's door.
- 289 Control module, anti-theft alarm, on the right-hand side under the dashboard behind the knee shield.
- 434 Motor, central locking system, fuel filler flap, adjacent to the fuel filler flap.
- 435 Microswitch, beside the lock cylinder in the front passenger's door.
- 514a Switch, simultaneous actuation of the central locking system, in window lift switch assembly (386) on the center console.
- 583 Control module, anti-theft alarm with immobilizer, under the dashboard on the right-hand side behind the knee shield.
2-Pin Connectors
- H2-14 In the right-hand front door, beside the locking mechanism.
- H2-16 Beside the locking mechanism inside the right-hand front door.
- H2-30 In the right-hand rear door, beside the locking mechanism.
- H2-34 Beside the locking mechanism inside the left-hand front door.
- H2-36 In the left-hand rear door, beside the locking mechanism.
- H2-73 Beside the locking mechanism in the driver's door.
- H2-74 On the right-hand side in the luggage compartment beside the central locking motor for the fuel filler flap.
4-Pin Connectors
- H4-13 In the left-hand front door, adjacent to the microswitch.
- H4-19 In the passenger's door beside the locking mechanism.
10-Pin Connectors
- H10-14 In the luggage compartment to the left beside the rear filament monitor.
- H10-22 In the right-hand B pillar.
- H10-24 In the left-hand B pillar. 22-Pin Connectors
- H22-1 Behind the cable entry in the left-hand A pillar.
- H22-2 Behind the cable entry in the right-hand A pillar.
Grounding Points
- G6 Grounding point, negative distribution terminal, in the main fuse box (22B) behind the glove box.
- G8 Grounding point, dashboard, by the left-hand front loudspeaker socket.
- G14 Grounding point, left-hand front seat member.
DESCRIPTION OF OPERATION
With the key in the driver's door or front passenger's door, all the car's doors and fuel tank filler cap can be locked and unlocked centrally.
Control module 175 for the central locking system is continuously supplied with current via fuse 16.
The control module is controlled from microswitch 274 in the driver's door, microswitch 435 in the passenger's door or from a switch in switch unit 386 in the centre console.
When the doors are locked, terminal 2 of the control module is grounded and current is supplied for 0.7 seconds to all actuating motors, closing the locks. The motors are grounded via terminal 8.
When switch 514a (LOCK) on the centre console is activated, terminal 5 of the control module is grounded and current is supplied for 0.7 seconds to all actuating motors, closing the locks. The motors are grounded via terminal 8.
When the driver's or passenger's door is unlocked, terminal 1 of the control module is grounded and current is supplied for 0.7 seconds to all actuating motors, opening the locks. The motors are grounded via terminal 7.
When the switch on the centre console is activated (by pressing the part of the switch with no symbol), terminal 6 of the control module is grounded and current is supplied for 0.7 seconds to all actuating motors, opening the locks. The motors are grounded via terminal 7.
If the driver's door is not completely closed and an attempt is made to use the central locking system from this door or from the switch on the centre console, it will not be possible to lock the doors.
If an attempt is made to use the central locking system from the passenger's door when the driver's door is not completely closed, the control module will lock the doors, only to unlock them again shortly afterwards.
FAULT DIAGNOSIS HINTS
- Check that fuse 16 is intact and supplied with current.
- Check the connectors, wiring harness and ground connections.
- Check that terminal 4 of the control module is supplied with current.
- Check that current is supplied to pin 8 of the control module when the doors are being unlocked and to pin 7 when they are being locked.
IMPORTANT
Control module terminals 7 and 8 are live for only about 1 second , so readings on them must be taken at the precise moment when the locking mechanism changes position. In the inactivated position, both outputs are grounded. Note also that the actuating motors (on testing) should be connected only to pins 7 and 8 of the control module. Otherwise the motors could be overloaded and damaged.

